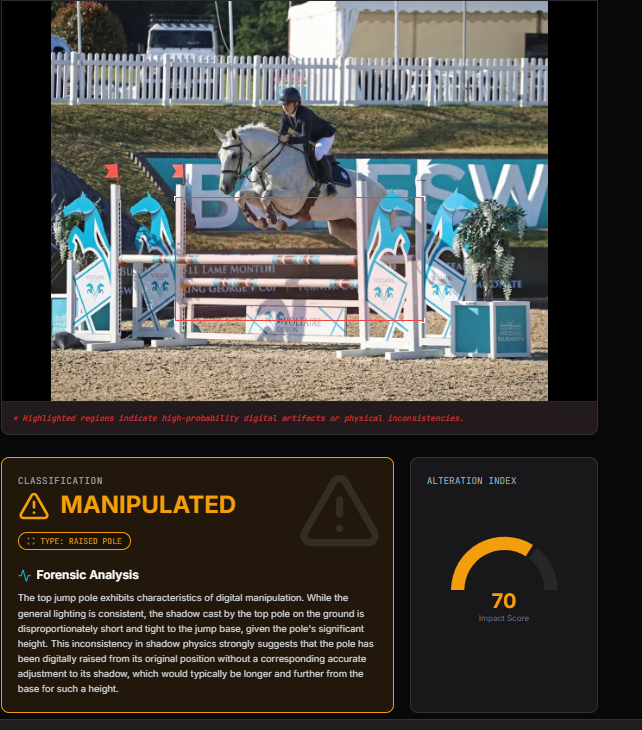
The Deepfake detector tool is designed to spot raised poles, altered photos etc
It’s not perfect but it will give a confidence estimate. Here are two examples, one is me & my horse Cami, the other is merely what we thought we looked like.
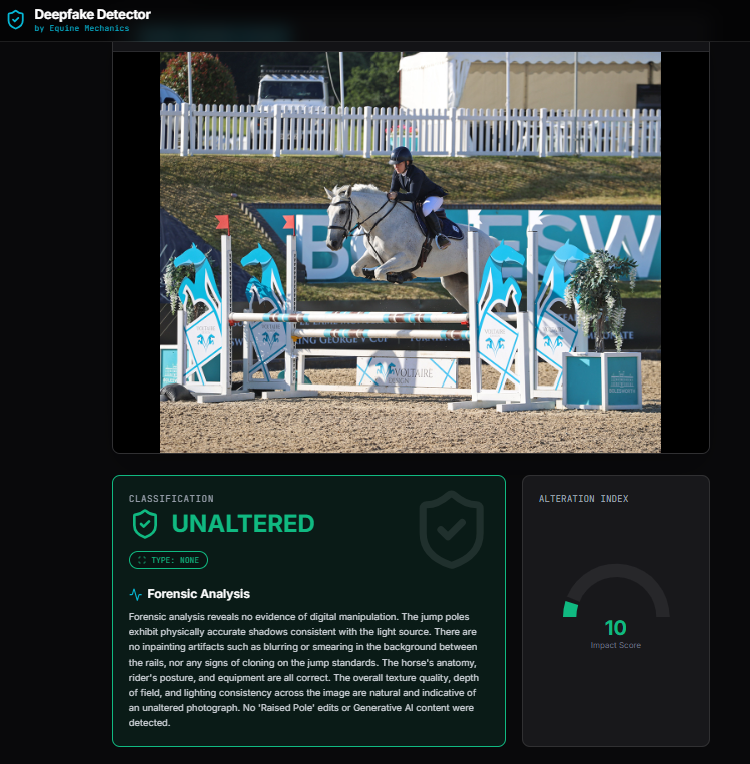
The Deepfake detector tool is designed to spot raised poles, altered photos etc
It’s not perfect but it will give a confidence estimate. Here are two examples, one is me & my horse Cami, the other is merely what we thought we looked like.
This tool allows at home equine biomechanics analysis. Just click and use, no installation needed

FAQ
Is it free?
Yes, totally free, I made it to track PSD rehab in my own horse, because I’m from a biomechanics and motion analysis background.
Is it perfect?
No, but it’s useful
Is it accurate enough?
It does very well when cross-validated against Equestic accelerometers, but much more usefully it’s repeatable, so my aim is to spot change rather than diagnose abnormalities
If it’s not diagnostic then what’s the point?
Information is power and particularly when it’s comparison over time. Whilst it’s interesting to know that one hock has a greater range of motion what we’re really looking for is change. Is there improvement in symmetry with training, or is that hock just getting stiffer? Has that fetlock elasticity suddenly deteriorated?
Do I need a lot of trot?
No, a few strides is fine, it’ll tell you if your video is rubbish. Ideally side on but it’s pretty good at compensating for a curve and sometimes curves help show up issues. Obviously the analysis only tells you what’s in the video, so the more representative the video the more representative the results. I like to look at the few strides of trot my horse takes into the ring on the first day of the show versus the third, and sometimes I just capture a bit of trot on the lunge.
Will it work for dogs?
Not really, it’ll give it a go, but if people keep asking this then I’ll make a dog version
Wil it speak Spanish?
No. Mostly because I can’t QA Spanish.
Will it hallucinate?
There are different types of AI. This one is built on python code (maths) but does use an LLM for the pretty interface. If you were determined you could probably break it but it has no capacity to hallucinate joint angles, impact timing or similar
Can I pull up my previous video?
No, it has no capacity to store your video (by design). If people keep asking there may be individual login/ personal versions in future
Is there a limit to how many videos I can analyze?
No. Go wild
There’s a compelling theory that if we do less when horses are younger and give them longer to mature then they’ll have longer, healthier, careers. So why doesn’t the scientific research agree? Social media loves that bizarrely-inaccurate infographic of skeletal maturity and growth plate closure that somehow never gets called out, but underneath the pseudoscience, some concerns are real
What the science actually shows:
There’s a good overview in a 2021 review in Animals, where Team Massey / Chris Rogers – consistently credible researchers into the effects of early exercise – directly examined skeletal maturity. They looked at growth plate closure and somatic growth and saw that horses complete the equivalent of rapid infant growth by weaning (4–6 months) and completes childhood growth by roughly 11 months old. At 2 years old, the horse has achieved most measures of maturity, including the closure of growth plates.

Figure taken from Rogers et al., 2021, summarising findings for relative maturity for horses and humans
All the scientific literature shows that the growth plates of the vertebrae (spine) close around 18 months and that’s pretty much final mature morphology. So why are there so many articles and pictures doing the rounds saying the spine is mature by 5-8 years? Some of the “vertebrae” that form the wings of the pelvis (tuber sacrale and tuber coxae) might fuse late, at around 5-8 years, so it’s likely that’s where part of the confusion originally arose. Similarly there’s a much-cited old dissection paper by Haussler et al. in 1997, showing some evidence for cartilage in the sacral vertebrae in 5-8 yo TBs, which often gets quoted as “the spine”, “open growth plates” and extrapolated to the idea that riders could sprain a horse’s back. More recent research from Elizabeth Collar at UC Davis (2020) using CT and histology found that lumbosacral growth plates are inactive by 2 years of age, as expected, but that cartilage remnants may persist much longer, which is what was found in Kevin Haussler’s dissection. These misunderstandings are always self-propagating and now if you Google it, you’ll get a load of articles reporting misunderstandings as fact. Would it matter if the pelvis had unfused growth plates? If your horse is in a very specific accident then at a stretch perhaps, otherwise no, there’s no reason why it would. It’s not a relevant part and even if it was, actual growth has finished well before closure shows up on x-ray, and growth plates are not a weak point, they just look like a gap on x-rays because it’s a different type of tissue.
The muscles and bone strength are still underdeveloped in a young horse and that does matter. For instance, the back needs to be supported by an abdominal sling and if it’s not then damage can be done, but the right way to develop that is with (controlled, well-judged) work. Bones, cartilage, ligaments and tendons need to develop and the best way to condition these is also controlled, well-judged work, which will decrease the chance of lameness in later years. And yes, the brain is immature so we can’t drill the horse, and it needs to fun because why else should they do it. This is a world away from the idea that working a horse is going to hurt it but still agrees with not doing the wrong sort of loading.
Functional Adaptation 101
1. The “Window of Opportunity” (Tendon & Cartilage)
From a tissue-science perspective, waiting until a horse is “mature” (age 6+) can actually be a disadvantage.
2. Wolff’s Law vs. The “Soft Bone” Myth
The idea that young bones are “soft” and should be bubble-wrapped is also a biomechanical oversimplification.
3. Where the Concerns are Actually Biomechanically Sound
The argument for not jumping isn’t necessarily wrong, even if the “growth plate” reasoning is a little crazy.
So don’t wait until the plates close but find the threshold where you trigger adaptation without causing micro-fractures. Jumping grids at 3.5 years old is likely exceeding that threshold for the spine and sacroiliac joint, even if the legs can handle it. (Jean-Marie Denoix is great on the sacroiliac joint, if you’re looking for a literature rabbit hole).
Our concerns about horses being retired early are also valid, but the causes are more complex than “started too young.” We need to look at overtraining, inappropriate training methods, poor surfaces, inadequate recovery time, or riding horses through pain. The growth plate confusion becomes a proxy for a broader welfare argument that deserves a more sophisticated analysis.
The mislabelled pictures and the social media arguments take pieces of real anatomical facts (vertebral physes do close slightly later than limb physes) and draw conclusions the research doesn’t support (therefore no meaningful work before 5-6 years). Partially understood science being misapplied. The horse evolved as a precocious cursorial species. The requirement to avoid predation and cover significant distances while the dam grazes has altered the relative temporal pattern of growth phases. Within their first week, foals cover 7+ km daily. This isn’t an animal whose skeleton evolved to be protected from load until age six. Ironically equine development and equine biomechanics are fields where we have really solid evidence and good scientific support, and it’s always in danger of being drowned out by louder voices.
Selected Refs, badly organised
Brommer, H., Brama, PA, Laasanen, Helminem, van Weeren, PJ, Jurvelin, JA., Functional adaptation of articular cartilage from birth to maturity under the influence of loading: a biomechanical analysis. EVJ 2010, 37,2 146-152
Butler, Janet A., et al. Clinical radiology of the horse. Blackwell Scientific Publications Ltd, 1993. [Vertebrae growth plates closure]
Fretz, P.B.; Cymbaluk, N.F.; Pharr, J.W. Quantitative-analysis of long-bone growth in the horse. Am. J. Vet. Res. 1984, 45, 1602–1609. [growth stops before physical closure]
Logan AA, Nielsen BD. Training Young Horses: The Science behind the Benefits. Animals (Basel). 2021 Feb 9;11(2):463
Łuszczyński, J., M. Pieszka, and K. Kosiniak-Kamysz. “Effect of horse breed and sex on growth rate and radiographic closure time of distal radial metaphyseal growth plate.” Livestock Science 141.2-3 (2011): 252-258.
Moffat, P. A., et al. “The influence of exercise during growth on ultrasonographic parameters of the superficial digital flexor tendon of young Thoroughbred horses.” Equine Veterinary Journal 40.2 (2008): 136-140.
Rogers, C.W.; Gee, E.K.; Dittmer, K.E. Growth and Bone Development in the Horse: When Is a Horse Skeletally Mature? Animals 2021, 11, 3402. https://doi.org/10.3390/ani11123402
Rogers, Christopher W., et al. “Evaluation of a new strategy to modulate skeletal development in racehorses by imposing track‐based exercise during growth: the effects on 2‐and 3‐year‐old racing careers.” Equine veterinary journal 40.2 (2008): 119-127.
Rogers, Chris W., et al. “Early exercise in the horse.” Journal of Veterinary Behavior 7.6 (2012): 375-379.
Strand, Eric, et al. “Radiographic closure time of appendicular growth plates in the Icelandic horse.” Acta Veterinaria Scandinavica 49.1 (2007): 1-7.
Veraa, S.; Scheffer, C.J.; Smeets, D.H.; de Bruin, R.B.; Hoogendoorn, A.C.; Vernooij, J.C.; Nielen, M.; Back, W. Cervical disc width index is a reliable parameter and consistent in young growing Dutch Warmblood horses. Vet. Radiol. Ultrasound 2021, 62, 11–19. [wither height as proxy for vertebral growth]
#equinebiomechanics #biomechanicstheory
So today we answer the question “why do the
Whitakers, Nick Skelton etc. ride with their elbows sticking out?”
I say we. I mean me, but you know join in
any time.*

I’m slightly fascinated with the “Whitaker
elbow.” In the 90s we all did it and as I just wrote up some old notes (see 12 things I learnt on my first Tom Whitaker lesson) it sprung back to
mind again. Conventional riding position has your elbow fairly flat to your sides, giving you a fuller range of arm length and more effective shock absorption.
It allows your hands to follow the horse’s mouth, giving a soft contact. Yet in
show jumping, particularly in old school riders, an outward elbow is common –
think John Whitaker – or any Whitaker – Nick Skelton, Tim Stockdale etc. I’ll let you do the Google work.
So what’s the advantage?
First let’s recap the conventional position
and hopefully head off any angry commentators.

If like me you have a short arm this gives
you extra reach for the horse to lengthen his neck. It also gives you more degrees
of freedom (elbow, shoulder and wrist), and better motor control, so you’re
more able to move your hand as necessary to keep rein tension constant (follow
the horse’s mouth). It’s genius, it works and I’m not here to argue against it.

Same scale with arm (glenohumeroid) more flexed and elbow
more extended, and look how far the hand has moved. Brilliant.

What happens if we turn our elbows out? To
imitate this posture we’re both abducting the arm (moving it away from the
body) and rotating it so that the elbow swings forward. What happens then is the
shoulder and back muscles are stretched, opening the rib cage (pectoralis) and pulling
on your spine (rhomboid major). This also activates your core muscles (which include
spine stabilisers, diaphragm and the abdominals) to stabilise the spine and rib
cage.


Graph
for people that like graphs. Confusingly here negative adductions (to the left) mean movement
away from the body, which increases pull on pectoralis major.
Elbows
out is often used in “power poses” which are meant to give a confidence boost or psychological
lift and I suspect this is partly as a back widening effect, and also partly
as opening the ribs improves breathing, which in turn calms the physiological (fear)
response. I’m speculating here.
Sadly for any type of riding, soft hands are basically
everything and this posture definitely puts your soft hands at a disadvantage so this isn’t a recommendation.
Try now just moving your hands forward and back towards an imaginary horse’s
mouth in the elbows-out and elbows-in positions and feel the resistance that turning your elbows out causes. However personally I often adopt a “sit tall, elbows
out” posture for at least the first fence or two if I’m feeling nervous when I’m jumping,
and for me and my horses it helps. At my (low) level of refinement the thing that helps my hands the most is a stable core with relaxed arms so if turning my elbows out a little even just reminds me to do that then there’s another trick that I have.
*
This is a real quick and dirty “I should be cooking dinner”
set of calculations based mostly on the musculo-skeletal modeller’s
perspective of the effects of turning out the elbows, not anyone’s actual reasons. Happy to hear more applied or considered thoughts. Also I’m not
really allowing for the full 3D aspects here and if there’s one
cardinal biomechanics rule it’s always be very, very careful if you’re not in
full 3D. It’s easy to measure and analyse things in 2D. Easy, and almost always
wrong. In this case I have looked in 3D but only in a static sense. Similarly in places I say shoulder joint, when I mean one or all of the four girdle joints, and so on, because let’s not get carried away here and hide behind confusing terminology in place of accuracy. If there’s
interest in this beyond my dinner-time musings I can always actually run some movement
data and model it properly!


There’s been a bit of a quiet patch on the site with no new articles for a while. The Mighty Hobo came temporarily out of retirement and I pared down all other activities to spend as much time with him as I had, and we loved every minute that we got to spend doing our favourite thing. Below is the last jumping round we ever did, two months ago now. If you look carefully you can see he has too much extension in his fetlocks, indicating too much ligament laxity – subsequently confirmed as Equine Systemic Proteoglycan Acculumation (ESPA, also known as Degenerative Suspensory Ligament Desmitis). He is also losing his jump a little but this is hard to spot if you’re unfamiliar as he tries so very hard. He was immediately re-retired and is currently enjoying (OK hating) some time with his pony in the field where we hope to keep him comfortable enough for a little while longer.
The little buck through the finish isn’t resistance or pain, it’s because I allowed him to lock on to the wrong final fence – he’s a professional so he only bickers with me once he’s got us over the jump. Hobo pretty much only jumped clear rounds and I never carried a whip. The freeze frames below make the hyperflexion issue a little easier to see as his fetlocks hit the deck even in canter (as opposed to take off or landing, where it is not so abnormal). Apologies that the video is not great quality due to it’s circumstantial nature.


Below is a video of a comparative, unridden canter & trot in the field over a year ago but with hindsight already a little suspect.
Ultrasonic evaluation of suspensory ligaments can confirm or rule out lesions or degeneration,
and it is usually the suspensory ligaments that fail first. The main reason, though, for the change of name to ESPA is that it is a systemic disorder so all connective tissues may be affected, including the ligaments, tendons, heart and eyes (e.g. Halper et al., 2006). These horses will not improve, we do not currently have a way to stop or reverse proteoglycan accumulation, they can only be managed in their deterioration until the time comes for euthanasia. It appears to be hereditary, so breeding must be avoided, although it is no longer thought to be restricted to certain breeds. Symptoms may become apparent from birth and Hobo was lucky to manage his condition for as long as he did, given that we didn’t even realise what we were up against.
With my boy on his way out I’m planning to throw myself into some more articles, videos and demos and would be very happy to hear your requests. We currently have a few series to continue including rider exercises, the equine back, and horse gear and gadgets. There may also be the odd mention of the glamorous Mr Remus (below) who is doing his best to step up, but they’ll never be another Hobo, and the Hobo updates end here.


I have a teenager. He’s fairly sweet and not normally given to tough love. Here’s what he had to say about my most recent riding injury:
Me: It’s just unfair. I tucked, I rolled, I got out the way of the horse. I did what I was meant to do.
Teenager: And you broke your shoulder not your back. That’s exactly what’s meant to happen. Now you get over it.
Voila, the effect of being parented by a biomechanist who consults in forensics. My son instinctively understands a fail-safe. From an engineering perspective a fail-safe is a way of preventing a more serious failure. It is a safety net – it doesn’t stop you from falling, but it does prevent the full impact of hitting the floor. It’s inconvenient when your house plunges into darkness because of a trip switch or a fuse that’s blown, but on the plus side
your house did not burn down and you are not on fire. In the horse’s legs the accessory (check) ligaments of the flexor tendons are partly a fail safe. When they break it is a large problem and they take a while to heal but nothing like the carnage that would have occurred if the check ligament had not “taken the strain” literally and figuratively and the main tendon had been allowed to tear.
In the British horse industry in particular, we love a fail safe. We tie our horses up with a breakable link, designed to snap under tension, a practise often frowned upon in the U.S.A. I see the arguments on both sides but I will say this: I once cross-tied a horse with both a leadrope tied solid and a travel bungee. When the horse slipped the travel bungee did exactly what it was meant to do and snapped, the leadrope did not and it flipped the horse over. The physical and psychological damage was pretty dramatic, and even the pure financial cost was a lot more than a replacement bungee. Anecdotal evidence counts for little other than to illustrate that whilst there are few times when you want an unexpectedly loose horse, there are some.
I’ve seen a lot of people complain when their kit broke, and I myself have lamented my damaged hat, ripped rug, snapped headcollar, etc. Working in equine biomechanics as an expert witness though, I’ve seen a lot of what happens when there is no fail safe. Personally, I’ve broken my ankle against a stirrup, so last year when I merely broke my stirrup I was happy enough to pay out to replace it. Similarly when a rug rips or the catch breaks, it’s always frustrating, but I’ve seen the alternative and that’s really not pretty. We use leather headcollars not just because they look the business but because – in the case of no acceptable alternative – they snap. Your stirrups may now be safety stirrups and your stirrup bars have long been designed to release the leathers. It’s worth extending that logic to every part of your horse’s world – your tack, your haynets, your ring-feeders, your fencing – if this fails, does it fail safely? If not, sometimes it can be quick and simple to change that. A fail safe is often cheaper than what it can save you from having to replace.
One of the most successful developments in this area is the safety cup (showjumping) or frangible pin (eventers). Gone are the days when even in showjumping if you came downwards onto a pole, such as a horse hitting the back bar of a spread, the only way that pole was going to shift was if you broke it in two (as often we did). Now cups are designed to release whichever direction you hit them in and I would encourage anyone to ensure that this is the type of cup they use in their competitions and at home. This release means that the cup also “fails” by hitting the ground and needs to be reset along with the pole, but as riders we already endure greater hardships than this. Horses do not need to hit their legs hard to learn to be careful, and jumping should be about the confidence to make mistakes, not a high-risk sport. The rotational fall is our greatest cause of serious injury and could yet be eradicated – the horse should never strike a solid enough object to be thrown into a cartwheel.
If release is not an option, our second defence for injury prevention is to dissipate the incoming force. Crumple zones in cars make modern vehicles rather easy to dent, but by folding up in a predetermined way the car protects the central passenger section from the worst of the blow. Someone else explains that here.
Your helmet is designed along the same lines to protect your head by self-destructing to absorb the blow. It’s got a pretty case around the outside so sometimes you can’t see the damage but still if you bash it you need to replace it. Body protectors on the other hand work by being hard, and saving your body from minor injuries and fractured ribs. They are not a fail safe. They won’t actually protect your spine or prevent internal soft tissue or crush injuries, that’s not what they’re designed to do (e.g. Mills and Gilchrist, 1990; Kelly et al., 2004). The utterly misleading misnomer “back protectors” and their compulsory use in some equestrian disciplines has rather dented any development or acceptance of the spinal protectors seen in other sports. There are plenty of people who tell stories where “without my back protector I would have had a spinal injury” but at the moment the evidence doesn’t support that. Various companies are trying to improve safety and create body protectors that can protect your spine. There is evidence for the need for better safety gear – particularly supports for the cervical spine – and only greater public awareness will help get these products developed.
I jump in a helmet/hat which is lightweight, flexible, vented and peaked. Those elements make it comfortable and beautiful, but give the manufacturers a nightmare job in making it sufficiently safe. My hat adheres to current safety standards, none of which address protection from rotational (brain-tearing) injuries, and those are the cases that would break your heart. These companies are the people we trust with our lives, yet bombard with our mostly fashion-based demands. We undermine them not just with our need for practical wearability, but with social media posts “exposing” hats which break into pieces – as many of the most safe are designed to do, in order to deflect the impact and save our heads. I wish every manufacturer every luck with their task.

Sox: externally rotated hinds, otherwise conformation just right.
An endo skeleton is a skeleton
that is worn on the inside. Some creatures, like beetles, have exo-skeletons
armour-plating their outside, horses have endo-skeletons providing support and structure from within, framed around a backbone, which makes them vertebrates.
Vertebrate bones are incredible piece of engineering.
Designed to withstand forces from all directions whilst still being as light as
possible. To do this, large parts of the bones have a honeycombed trabecular structure which has
been much copied in man-made materials. Trabecular or cancellous bone is basically composed of a series of small beams, so there’s material
where it’s needed, in the form of little supportive struts, and none where it
isn’t needed, cutting down on any extra weight. The property that’s really,
crazy, blow-your-mind clever, that we struggle to replicate in man-made
materials is its ability to adapt. The much-quoted Wolff’s Law tells us that
bone will adapt to the loads placed on it. That means that as long as you and
your horse are alive your bones are constantly adding struts, thickening parts,
and removing (reabsorbing) other parts. The whole system is constantly under
reassessment.

Why do we need to care about this particular marvel of
anatomical science? It means a number of
things for your horse. It means that:
a) Bones remodel to the strength we tell them that they
need. This means that they need an advance heads-up. If you’re going to do
something high impact, or have suddenly increased impact following box rest
then BUILD UP. By using repeated loading
within the horse’s current capabilities you can increase bone mass and strength
and hence stretch what is safe for him.
b) Bones are strongest in compression, since that’s the
direction they’re designed to load in. If they’re suddenly, unexpectedly loaded
in a different direction, for example by a bending force, they can often just
snap.
c) Bones will do their best to remodel if not correctly
aligned due to conformational defects, but usually this will mean bypassing the
bone and putting the extra strain on the joint.
Joints allow the skeleton to move. They’re essential, they’re magical, they
create the part of biomechanics that most people are the most excited about,
and yet they are a terrible weak point in the system. The majority of
orthopaedic problems originate at the joints. When we talk conformational
defects we’re normally talking about joints. The bones are just the linkages
that make the joints easier to see. The bones may be too long or too short, or
headed off in the wrong direction, but that deviation originates and inserts at
a joint, where the price is paid.

The joints are held together by collateral ligaments and
joint capsules and usually move due to articulating surfaces. This means that
it’s the collateral ligaments, articular surfaces and joint capsules that often
fail, along with the tendons responsible for taking the strain when movement
occurs.
Whether the horse is still or moving, it has to cope with
forces. If a horse stands on the ground, it is pushing down into the ground
with its body weight. Have a horse stand on your foot, it hurts. Horses rarely
stand on your hand. You can get kicked on the hand, sure, but then your hand
moves out of the way unless the floor supports it. I’ve yet to see someone
exert enough force with their hand to hold the horse up. At the same time as the horse is squishing
the ground, the ground is pushing back on it with an equal and opposite force.
Sometimes it doesn’t and the horse just sinks into the ground, but usually,
eventually, the ground pushes back hard enough that the horse can stand on the
ground.
We can measure this reaction force, the most confusing of
Newton’s forces, using a force-plate mounted into the ground. This can tell you
how much weight a horse is putting through an individual leg, by telling you
how hard the plate is having to push back, and what direction it’s pushing in.
In an ideal world we’d have one in every yard and vet clinic, telling us about
the subtle changes in the way the horse feels and functions. Biomechanics is
all about reactions to forces, and these are some of the very
forces we’re interested in.
Align these forces correctly with the bones, so they pass
straight through the joints, and the skeleton functions at its most efficient.
If a joint is not well-aligned, it will experience extra strain, and
potentially disease and failure.

Whether
you’re choosing a new horse or trying to make the most of the one you’ve got,
being able to judge conformation is a handy skill. No horse is perfect but if
you’re aware of your horse’s weak points there’s a lot you can do to mitigate
defects, maximise soundness and make sure he’s up to the job. Many aspects of
conformation vary with breed and so some breeds may be more suited to one
activity than another, as different equine sports have different requirements.
However there are also a few basic conformation flaws worth watching out for in
all ridden horses.
As we’ve previously covered the
horse’s skeleton is actually very similar to our own. In the horse instead of
wrist we say knee, and instead of heel we say hock, but most of the bones and
tissues are the same. The horse is adapted to be as light and fast-moving as possible,
so he runs on his third fingernail/toenail, not the flat of his foot, and has
lost all “unnecessary” bones, including all of the other fingers and
toes. These adaptations leave a lot of bouncy joints for shock absorption, and
a lot of scope for variation.
Distal (lower parts of) legs
To assess limb conformation
you need a horse to stand well, and view him from the side, front and
back. Basically you’re looking for a
straight, well-balanced leg, with no major twisting in any direction.

Examples from the MUST HAVE book “Equine Locomotion” (Holmstrom Chpt, Back & Clayton Eds).
Pastern length is one of the
first aspects to check in the fore and hindlimb. If the pastern is too long the
fetlock will flex more, leading to excessive strain in the tendons or their
insertion points (such as the navicular or coffin bone). If the pastern bones
are too short or “upright” there won’t be enough flexion at the
fetlock for effective shock absorption. This means that if your horse has
pasterns that are unusually short or long, then you should minimise high impact
activities such as trotting on roads or a lot of jumping.

Straightness in the forelimb
In the front leg, a horse that is over at the knee has the
appearance of a permanent knee bend, and this is not really that serious. A
horse that is back at the knee looks
like the knee has bent the wrong way. This causes additional strain on the
tendons and ligaments that struggle to maintain posture and support the weight
of the horse, particularly in jumpers or
racehorses. For these horses it’s a good idea to focus on tendon strengthening
exercises such as hill work (see previous posts).

Hobo: straightness from the front, check. Ability to wear a rug, lacking.
Pigeon toed (turned-in toes)
and toed-out horses are common. Toed-out hindlimbs are present in 80% of
warmbloods, so can be considered normal, and can even help with half-pass and
shoulder in. Toes that don’t point straight ahead are still not ideal due to
the increased stress to the lower parts of the limb, but not serious. Horses
with toe-in or toe-out are often seen competing at higher levels and it’s not
strongly associated with break down, although more extreme examples may cause
problems. Base narrow, toe-out forelimb conformation can increase interference
(brushing) injuries including splints so is often avoided in dressage horses.
For all other activities the addition of brushing boots can go a long way to
minimising this problem!
Toe-in conformation is often
seen with bench (offset) knees, which although common may predispose the horse
to splints and fetlock problems. These horses need to avoid deep surfaces where
possible.
Toed-out hindlimbs are not
the same as a cow hocks (narrower at the hocks). Horses who are only toed-out
and not narrow at the hocks will present a vertically straight hindleg if you
stand behind the point of the hock (and not behind the horse). Look at where
the hoof is pointed, forgive the deviation and stand behind the heel and hock,
then decide if the legs bend in at the hocks or merely point the wrong way. Sickle
hocks are over-bent when the standing horse is viewed from the side. They do
allow a horse to step under himself, but prevent him from being able to carry
that weight effectively and so are rarely seen in elite dressage horses. Poor
hocks, especially sickle hocks and cow hocks, have been associated with
osteoarthritis, bone spavin and back problems, so in these cases it is worth
avoiding occasions that cause a lot of strain – such as a lot of jumping, or
very deep or hard surfaces. Whilst horses with poor hocks might not have the
longest hunting careers, they rarely cause a problem in racehorses.

Hobo has straight but externally rotated hindlimb. Not cow-hocked, but looks similar from this angle.
On the other hand, in the
forelimbs knock-kneed conformation may even be protective and has reduced the
incidence of carpal fractures in racehorses.

Remus as a slightly knock-kneed
youngster (with poor hoof trim).

Straightness in the hindimb
As we reach the hoof, the
research shows that as the heels become more ‘underrun’ (low heels and long toes), the odds increase of
joint problems further up the leg. It is interesting that there is little
evidence that hoof angles affect the likelihood of disease or injury, only
evidence for the effect of hoof balance (differences between front and back).
Head, neck, body, upper legs.
Many aspects of conformation
that relate to the head, neck and body are difficult to measure objectively,
and so can lack scientific evidence, but breed differences in this area show
the effect of selective breeding for different activities. Plough horses and
racehorses look very different for a reason!
There is currently no solid
evidence linking shoulder conformation to injury, only performance. Elite
showjumpers and dressage horses have been shown to have more sloping shoulders
than average, and sloping shoulders correlate well with gait scores in young
horse performance testing.
It is worth remembering when
assessing the slope of the shoulder or croup that in some horses the outward,
muscular appearance does a good job of mirroring and representing the
underlying skeleton, but in many horses it doesn’t. It can be helpful to place
a piece of tape on the upper and lower parts of the shoulder bone to allow you
to stand back and observe the actual line. However a seemingly long and sloping
shoulder with good withers will place the rider in a good position in better
balance with the horse, and so the appearance of the shoulder can be as
important as its real slope.
Judges often use terms such
as “freedom of the shoulders” but high-speed analysis shows that
differences in forelimb movements are mainly influenced by the elbow joint and
not by the shoulder. Consequently a long humerus (upper arm bone) is strongly
correlated with performance in dressage horses, but rarely remarked on.
Elite dressage horses and showjumpers have flatter pelvises
than average riding horses, however again many horses have a flat croup
(muscles) and a steep pelvis (bone) so appearances can be deceptive. A flatter
pelvis assists pelvic rotation, and this is the most important determinant of
gait elasticity and jumping ability. On the other hand pelvic conformation does
not appear to affect longevity in hacking horses, and weakness here is often
compensated for somewhere else.
In the hindleg, a long, forward-sloping femur (thigh bone)
has been reliably and frequently shown to give both soundness and performance.
When we say that a dressage horse should be well “camped under” this
is the leg position that results from a forward-sloping thigh, which places the
hind well under the horse, aiding collection, balance and power transfer. It is
also possible to judge the femur’s position by marking both the point of the
hip and the horse’s knee, to allow you to judge whether the thigh bone slopes
forward or straight down. This is particularly important in hacking and riding
club horses where vertical femurs have been linked to leg and back problems.
Increases in height up to
around 17hh are linked to performance in showjumpers and trotters but not
dressage horses, and in all sports there is a massive variation in successful
horses. Sadly increased height also
comes with decreased soundness. Research confirms the adage that a short back
is a strong, healthy back, and good for performance, but it also predisposes
the horse to overreach injuries so overreach and solid brushing boots should be
considered.
Once we get to the neck, It’s
hard to objectively judge the actual “set” (attachment point), given
variations such as topline muscle, posture and wither height. A low set neck
can make it difficult for the horse to lift the forehand and so higher neck
posture is preferred for dressage. A longer neck can improve jumping
performance, acting as a counter-balance to the hindlegs, but a shorter neck is
common for dressage. Long necks can also increase fetlock problems, but only in
horses that race.
A wide throat latch (jaw) is
thought to facilitate breathing, although there is little evidence on this.
There is evidence that a wider-than-normal poll to throat latch distance is
often seen in elite dressage horses and showjumpers, and thought to help with
collection.
Many frowned-on conformational variables, including being
croup-high and lengths of cannon bones, do not affect the likelihood of injury
or disease, in the research at least. It’s an odds game, all we can do is give
ourselves the best chance we can, and then work with what we have. Other
factors such as temperament are just as influential, and for every solid
conformational rule, they’ll always be a
horse that beats the odds.

Perfect horse. Dog needs work.
Video of a powerpoint show giving a general introduction to equine biomechanics, made from recycling some slides. Might be a bit dry, just trying something out. If it’s popular I’ll do some more and make them a bit more dynamic!

Previously we’ve covered how the equine back
works in Part 1, which focussed on the musculo-skeletal structure, Part 2 went into
unmounted exercises to increase balance, strength, range of motion and
stability. Now to complete the equine back biomechanics series we’re going to look a little at ridden exercises and how to
strengthen the back with your schooling.
There are plenty of popular ways to build your horse’s back,
topline and core muscles whilst riding – keep him engaged, ride up hills,
shoulder in, work on transitions, do cavaletti. When it comes to why, how or
what they actually do though things often get a little more patchy. In this
part I want to cover what exactly these exercises do, which ones work, what
muscles they target, how to get the most out of them, and how to design the
exercises that suit you and your horse.
As discussed in Part 1 carrying a rider is a massive challenge
to the equine spine, and muscle activation is required to lift the horse’s back
into a position where it can support a rider comfortably. If the horse attempts
to carry the rider with the spinal column rather than the muscles, this will
hollow the back and cause pain, and potentially spinal impingement and damage. In
Part 2 we discussed trying to activate core muscles and to rotate and flex the
spine to increase range of motion (flexibility), reduce spinal impingement and
to build muscle strength, making it easier for the horse to round and carry a
rider correctly. Then we looked at combining these exercises with challenges to
the horse’s balance to make them more effective. In the ridden horse we have
the chance to again rotate and bend the spine, through less of its range of motion,
but this time with the added challenge to balance and strength of supporting
the weight of a rider.
As with the groundwork exercises the model for our ridden exercises is Meikle Rustler, a Welsh Section D who belongs to Alison Brown and is ridden by her mother Gillian Brown. Rustler and Gillian currently compete at medium level dressage.
Walk
Many people who have used a horse walker have been surprised by
the amount of topline a horse can gain just in walk. In walk the horse’s spine
is very mobile. It must bend in all three axes – flexing as it rounds and
hollows, bending laterally to the side and axially, twisting along its length,
and for all three types of bending its range of motion is dramatically higher
at the walk than in the other gaits. This means that in walk the horse has an
opportunity to address and increase his range of motion and flexibility, target
and release the muscles that move the spine and by stretching the spine and
hence opening up the spinous processes you can prevent and minimise spinal
impingement.
Walking actively, particularly up and down slopes tones the
abdominal musculature and prepares the horse for increased engagement and more
challenging work. Walk is also the ideal pace for exaggerated stretches, such
as asking the horse to walk a five metre circle around a cone or imagined spot,
with his nose very low on a long rein and an exaggerated bend, flexing to the
inside and out, to target spinal flexion and mobility, helping to increase
range of motion and loosen any tight spots.

Walking the circle. The
spine twists along its length to allow the near hip to raised and the near
shoulder lowered, bends in flexion, and laterally to the inside.
Trot
In trot the horse’s spine is mobilised with less range of
motion than in walk. The spinal muscles are activated and the ventral core
muscles such as the abdominals are recruited to control the movement. This
makes trotting with a rider on board an excellent work out for equine back
health. If the horse carries a rider correctly in trot, the muscles and spine
should continue to gain in strength and flexibility.
The addition of trotting poles or cavaletti increases the range
of movement at the trot, so increases the intensity of the work out, balance
challenge and stretching.


Rotating the shoulder in
trot, whilst bending on a circle.
Cavaletti
Cavaletti is often used just as another word for trotting poles
or pole work. Whilst it’s important for showjumpers, it’s also important for
dressage horses, or any horse that’s planning to use its back to support a
rider. Traditionally cavaletti were fixed poles suspended between cross-shaped
wings, which could be rotated for variable height poles, but these days people
mostly mean “getting the horse to step over things on the ground, in walk, trot
or canter.” What it doesn’t mean is jumping, just literally stepping over poles,
sometiems raised, usually in sets. Cavaletti/poles are great, they develop the
paces, the rhythm, the balance, the cadence, whether you follow showjumpers
like Scott Brash or dressage riders like Charlotte Dujardin and Carl Hester
you’ll hear an exhortation to do cavaletti. However pole work doesn’t just give
you a big rhythmic trot because the horse gets in the habit of picking his feet
up, it actually improves muscle tone, balance and flexibility.
Trotting poles or cavaletti in trot increase flexion in all the
horse’s leg joints and increase the amount of movement through the horse’s
back. This builds strength in the muscles and flexibility in all the joints, as
well as aiding muscular control and coordination. Unlike using weighted boots, tactile
stimulators or pastern weights, trotting poles also increase the amount of
flexion at the hip, activating the horse’s hip flexors. Similarly horses do not
have an ability to habituate to the poles, as no matter how many times they do
them, they still need to clear the poles, whereas horses can learn to ignore
pastern weights and other worn stimulators.
The height of the limb flexions shown and the amount of spinal
bending is proportional to the height of the trotting poles, and so these can
be increased as the horse becomes more advanced and more confident in his
visual coordination and synchronisation.
A single pole or single poles scattered all over the school are
constructive, but you can also get a more sustained work out by asking your
horse to walk and then trot over sets of four or more poles. For a walk
distance you need to move the poles in to be about 0.9 metres (a yard) apart,
in trot they should be 1.2 metres (4 foot) apart. After that there is no real
wrong solution with trot poles, you can use your imagination to create
interesting patterns. You might start by placing four poles out evenly and
change the rein after trotting over them to approach from different directions,
and build up to riding a figure of eight with trot poles along the diagonals,
and then even a serpentine with trot poles along each short side. You can miss
out a middle pole, leaving a gap of 2.4m so the horse trots a couple of steps
between poles, or ask him to follow the line of a curved set of poles. As long
as the horse is trotting actively forward he will continue to improve his back
strength and health whilst finding the work interesting and gaining confidence.

Charlotte Dujardin and Valegro,
using cavaletti in the warm up at the 2015 European Championships (photo Barbara
Schnell)
Shoulder in, shoulder
fore and lateral work
In shoulder in the horse is asked to bend to the inside whilst
continuing to travel forwards with impulsion, leaving the horse travelling
“on three tracks” when viewed from behind. Shoulder fore is a similar
exercise but with around half the amount of bend to the inside, making it a
useful building block both in terms of muscle development and the horse’s
education, confidence and understanding. These exercises are normally initially
performed along a wall or rail, by maintaining the bend as you come out of a
turn. The lumbo-abdominal flexion involved in shoulder in and shoulder-fore
shorten and challenge the abdominal muscles, particularly the internal oblique
and hence this is another exercise which is very effective in strengthening and
rehabilitating the back. The horse builds his muscles as he uses them to stay
in balance, and so it is better to achieve a small amount of bend in a balanced
way than to push the horse beyond what he can achieve correctly.
Once shoulder in is established further lateral work like
haunches in, leg yielding and half passes can continue to challenge these
muscles. As lateral work targets one side at a time (and should therefore always
be done in both directions) it is particularly effective in muscle development.
Lateral work targets lumbosacral mobility and hindlimb engagement (iliopsoas),
the ability to lift the forehand (pectoral muscles), and the difficult to
activate spinal control (multifidus muscles), and so it is often seen as a form
of rehabilitation for the back, in both a preventative and curative sense. It
does however put a lot of strain on the collateral ligaments around the pastern
and hoof, so should not be overdone.


Hill work
Hill work increases the challenge by making the horse work
against gravity. Hills can be incorporated not just into aerobic fitness, but
into schooling and muscle building exercises. For example you can ride a slow 15m-20m
circles in trot on the side of a hill, asking the horse to lower his nose and push
up the hill using his extensors of the hip and back (gluteal and paravertebral)
and then control his balance against the slope when going back downhill using
eccentric muscle contractions of the abdominal and hip flexors. For an advanced
horse you might even put a pole or very small jump on the hill, and incorporate
it into the slow 20m trot circle, and trotting poles on the lowest part of the
circle to increase flexion and rhythm.
Whilst this type of hill work comes highly recommended as a
rehabilitation exercise for the equine back and core, and can greatly improve
muscle strength and coordination, you shouldn’t underestimate how challenging
it is for the horse and initially it should not be continued for more than
fifteen minutes. I find this a nice exercise, without the poles, to incorporate
into my hacks, just throwing in a quick trot circle or two on a slope, trying
to keep the topline extended, before I charge off up the hill.
Canter
Canter involves the flexion and extension of the back (in the
hollowing and rounding direction), but not the lateral bending or axial
twisting seen in trot or walk. Work at
canter therefore does not have the same level of benefit of stimulating the
deep multifidus muscles or increasing the flexibility of the spine or strength
of the spine stabilisers as some of the walk and trot exercises. This doesn’t
mean that you don’t need the same spinal strength to canter, just that canter
alone is not the most effective way to build total back health. Canter does have
a large amount of active lumbo-sacral flexion and so is useful in building
strength in the abdominal and sublumbar muscles, which in turn support the back.
In canter the abdominal muscles contract concentrically,
shortening the rib cage and rounding the back. Depending on the leading leg
either one oblique abdominal muscle or the other is the main support. As well
as maintaining the flexion in the spine the abdominal wall muscles (rectus and
oblique) cause the pelvis to tilt downwards, tucking the hind end under. The
sublumber muscles (iliopsoas) flex the hip joint lending impulsion and further
flexing the pelvis and back. Finally the thoracic sling works to lift the
forehand. This means that whilst it doesn’t involve the same range of motion as
trot and walk, a correct canter with the additional weight of the rider,
requires a lot of strength and effort from the horse.
In counter canter the abdominal and sublumbar (rectus and iliopsoas)
muscles maintain the position and flexion of the hip, whilst the abdominal
(oblique) muscles shorten the trunk, and so this requires a lot of strength and
coordination from the abdominal girdle. Counter canter is a great exercise for continuing
to build strength once the horse is sufficiently advanced, but if attempted too
early it can cause tensions and rigidity which is counter-productive.
Jumping is a very different movement from that of trotting over
cavaletti, involving a flight phase, so whilst canter poles can be an important
part of the horse’s education and muscle development, they are very different
as muscle training exercises from trot poles. Canter poles are more similar to
small bounce fences causing flexion of the spine and putting great demands on
the muscles without requiring too much impact. Bounce jumps or canter poles
selectively increase the strength of the thoracic sling and upper neck muscles
through the abrupt loading and lifting of the forehand between the jumps. During
the flight phase, spinal flexion comes primarily from the thoracic spine and
lumbosacral joint, due to contraction of the abdominal and iliopsoas muscles,
and induces stretching of the supraspinous ligament and erector spinae muscle which
run along the top of the spine. This makes this an effective exercise in
opening up the spine in this direction, but also means that the horse must be
very well warmed up before bounces are attempted to avoid muscle or ligament
strains. The hip flexors and abdominal muscles also work to provide propulsion for
the poles or jumps, but these are most challenged by the increased engagement
at landing in the bounce, required so the horse can begin to lift his front end
before the hind end has landed, rather than the effort of take off itself.


In general if a horse is carrying a rider, his back is already
working, and great progress can be made merely from hacking out in an active
walk, and occasionally asking your horse to stretch down, and to flex left or
right, to open up his spine. By including a variety of the exercises mentioned
here, you should have a happy, healthy horse that continues to increase his
ability to carry a rider, becomes more powerful and balanced, and either
recovers from or prevents any back injury or soreness.
Photography: Abby Cook Photography, copyrighted to Sian
Townson.
Insights and resources on equine biomechanics for horse owners, trainers, and enthusiasts.